Yahi Sensing Station Assembly Instructions |
Yahi Overview Relationship between Yahi and PSI Mapping Pilot Assembly Instructions Installation Instructions Developers Data FAQ |
These instructions are for the benefit of those who have:
- received a Yahi Sensing Station kit unassembled (at present, this is true for only one person), or
- have purhased the parts separately.
For most people, the installation instructions will be more useful.
Kit contents
- 1 black plastic case, with ventilation and attachment holes for the sensor already drilled
- 4 cable ties
- 1 Grove Dust (Shinyei) dust sensor and cable
- 1 Spark Core
Assembly
Modifying the Grove connector
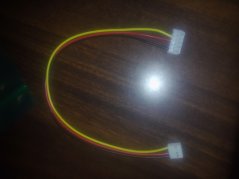
- Look carefully at the cable that came with the Grove Dust sensor. Notice that one end has a large connector that fits the Grove Dust sensor (top of the picture) while the other end has a smaller connector that is intended for connection to a Grove Base Shield (bottom of the picture). As we’re using a Spark Core instead of a Grove Base Shield, this second connector needs to be modified so that the signal lead (yellow) can go to a different part of the Spark Core to that which the power leads (red and black) do.
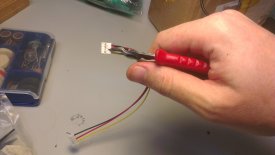
- Using fine wire cutters or similar, cut the small connector through the unused pin position into a single-pin connector with the yellow lead and a 2-pin connector with the red and black leads. You may wish to trim the excess plastic that is left behind.
Initial Assembly
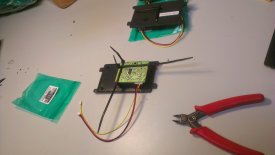
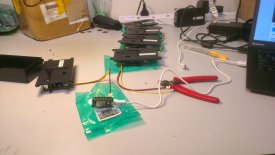
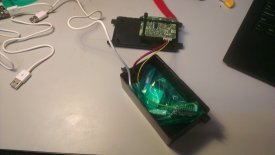
- Connect the large connector to the Grove Dust sensor and then fix the sensor in place with the cable ties. Apologies for the shortage of pictures, but note that:
- Orientation is important! When the text on the serial number label is the right way up, the cable is pointing down. (Equivalently: the Shinyei sensor must be oriented such that the cable connector is at its lower edge.)
- The design has changed since this photo was taken, you’re now attaching the sensor to the “bottom” of the box instead of to the lid.
- The cable ties will need to be used in pairs because they’re not long enough to be used individually. I’d suggest causing the joins to be at the edges of the circuit board as shown.
- Start by putting it all together with the ties loose, then gradually tighten them to get to the final position.
- When you’re finished, cut off the protrouding ends of the cable ties.
(If you’ve obtained your case separately then you’ll need to be a little bit creative with the holes. The important requirements are that:
- the inlet and outlet holes (2 rectangular slots) have access to air outside the box, and
- the cleaning access holes (1 roughly triangular, 1 roughly square) be blocked, both to air movement and to daylight.
)
- Remove the Spark Core and white USB cable from the box.
- Connect the USB cable to the Spark Core.
- Connect the 2-pin (red and black) connector to the VIN and GND pins at one corner. Orientation matters! Red to VIN, black to GND.
- Connect the 1-pin (yellow) connector to the D0 pin, diagonally opposite the VIN pin.
Network Connection
- Connect the USB cable to a notebook or PC.
- Check that the big LED on the Spark Core is flashing blue (i.e. waiting for network configuration)
- Start a terminal emulator
- Linux: “screen /dev/ttyACM0”.
- Windows: Use the terminal emulator (e.g. PuTTY) to connect to COM1 at 9600/n/8/1.
- Mac: Instructions by Saad (thanks!)
- Once connected, press the ‘i’ key once. You should get a message telling you that the hardware id is a number that looks something like 53ff6a065075535139311587. Take note of this Spark Core ID.
- Press the ‘w’ key once.
- At the SSID prompt, type in your SSID and press enter.
- At the WEP/WPA/WPA2 prompt, enter the appropriate digit and press enter.
- At the key prompt, enter your WEP/WPA/WPA2 key and press enter.
- After ~30s, the large LED should be cyan in colour and “breathing”. Your Spark Core is now in communication with Spark Labs.
Firmware Loading
- Register a Spark Labs account.
- Claim your Spark Core (click on the cores icon, Add New Core, paste in the Spark Core ID noted above, give it a name when prompted).
- Copy and paste the firmware.
- Select your core for flashing (make a yellow mark appear next to the Core’s name).
- Flash it (click the Flash icon).
- Wait about 2 minutes, make sure your Core flashes interesting things for a while, including some magenta. When it returns to “breathing” cyan, it should be running the new firmware.
- Click on the Settings cog
- Copy the Access Token
- Install curl if you’re not already done so
-
Type the following command:
$ curl -sS –no-buffer ‘https://api.spark.io/v1/events/yahi?access_token={accessToken}’ grep –line-buffered {sparkCoreId} -
After 30s, you should start seeing output like:
data: {“data”:”{ lpo: 181590, r: 0.605300, c: 314.227692 }”,”ttl”:”60”,”publishedat”:”2014-07-30T02:26:16.236Z”,”coreid”:”53ff72065075535122521387”} data: {“data”:”{ lpo: 39560, r: 0.131867, c: 69.127106 }”,”ttl”:”60”,”publishedat”:”2014-07-30T02:26:50.753Z”,”coreid”:”53ff72065075535122521387”} data: {“data”:”{ lpo: 0, r: 0.000000, c: 0.620000 }”,”ttl”:”60”,”publishedat”:”2014-07-30T02:27:25.876Z”,”coreid”:”53ff72065075535122521387”}
- Concentration (“c”) numbers in about the 0-600 range indicate clean air in Singapore. (More about this concentration reading.)
Final Assembly
- Place the Spark Core in the bag that the Grove Dust Sensor came in. This is primarily to prevent short circuits between the Spark Core and the Grove Dust sensor.
- Place the Spark-Core-in-a-bag in the space to the right of the Grove Dust sensor in the box so the USB cable passes through the small notch at the side. (Apologies, no up to date photo. Use some imagination and care :-))
- Attach the lid.
Calibration
This is a little difficult, and is the reason for Yahi Sensing Stations usually being supplied assembled and tested. The only basis for calibration used in the Yahi project at present is to place new sensors outside at HackerspaceSG with a pair of sensors that have been there since the beginning of the project and verify that they read in the same range for several days of readings. If you’d like to and are able to place your sensor at HackerspaceSG for a few days then I’ll be happy to perform the comparison.
Registration
If you’d like your sensor to appear on the Yahi map then drop me a note stating:
- The Spark Core ID that appeared when you pressed the “I” key during network configuration above.
- The installation location (street name and number so I can place your sensor on the map, I don’t need unit numbers).
Installation
You can now follow the installation instructions.

