Yahi Sensing Station Installation Instructions |
Yahi Overview Relationship between Yahi and PSI Mapping Pilot Assembly Instructions Installation Instructions Developers Data FAQ |
WiFi
- Remove the lid from the sensing station.
- Connect the sensing station to your computer’s USB port (i.e. instead of directly to a plug pack; if the device is not connected to your computer then you won’t be able to talk to it).
- Verify that the LED on the Spark Core is flashing blue. If it is flashing green then you may need to work through resetting the network configuration. If it is neither flashing blue nor green then contact me.
- Complete any driver installation if required (e.g. if messages appear about needing to install a driver).
- Use a serial terminal emulator to connect to the Spark Core
- Linux: “screen /dev/ttyACM0”.
- Windows: Use the terminal emulator (e.g. PuTTY) to connect to COM1 at 9600/n/8/1.
- Mac: Instructions by Saad (thanks!)
- Once connected, press the ‘i’ key once. You should get a message telling you that the hardware id is a number that looks something like 53ff6a065075535139311587. If this doesn’t happen, or you have an error about connecting to the serial port, then you may need to work through resetting the network configuration.
- Press the ‘w’ key once.
- At the SSID prompt, type in your SSID and press enter.
- At the WEP/WPA/WPA2 prompt, enter the appropriate digit and press enter.
- At the key prompt, enter your WEP/WPA/WPA2 key and press enter.
- After ~30s, the large LED should be cyan in colour and “breathing”.
Physical installation
For the mapping project, the sensing station needs to be:
- Outside! Little useful data will be obtained by measuring the cleaner, slower changing air indoors.
- Sheltered. It’s not designed to be placed directly in rain, although a little spatter won’t hurt it; under shelter on a balcony is ideal.
- Close to power. At present no battery-powered option exists, this usually means that you’ll need a hooded power outlet.
- The right way up. It needs to be standing on a long side with the text on the label the right way up. This is because the sensor contains a small heater which creates a convection current to keep air moving through an internal infra-red beam. If the device is not the right way up, the convection current won’t move as designed and detection will be impossible.
- Positioned so that the sensor’s holes are clear of obstruction. (This is particularly important for sensing stations #008-#013; the devices were assembled such that if you use the mounting holes in the case to mount the device on a wall, the sensor will be obstructed. This was corrected from #014 onwards.)
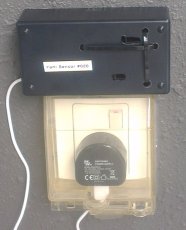
A typical installation. Note that this example uses a slightly more expensive plug pack because its low profile allows the hood to be completely closed.
A few people have suggested putting the sensing station on a windowsill and leaving the window open just enough for the power cable to pass through. This is OK at present, but it is likely that if the haze returns in strength then you’ll want to close the window completely! Once you’ve selected a location:
- Make a final check that the sensor is lined up correctly with the holes in the front of the case. (TODO: add photos) If it’s shifted during shipping so the holes are partially obscured then use a pen, small screw-driver, or something similar to gently push the sensor back into position.
- Place the sensing station in its final position, connect power and turn it on.
- In most cases I will have included your location in the database at the time your sensor was shipped to you, so you’ll see it appear on the map within a couple of minutes of your switching it on.
- If not, drop me a note with your sensor number (on the label on the front of the device) and location (street name and number so I can place your sensor on the map, I don’t need unit numbers) and I’ll confirm that it’s feeding data.

 </img>